CenterPoint Accounting for Agriculture
- Understanding and Modifying the Income Statement
Printing and Previewing Reports Video - Duration: 12 min 52 sec_24.jpg)
Customizing Reports Video - Duration: 16 min 18 sec
Report Favorites and Batch Reports Video - Duration: 9 min 50 sec
| Document #: | 3308 | Product: | CenterPoint® |
|---|
Income Statement Format Changes
Detail Report Selection Filter Changes
Income Statement Format Changes
The information below outlines the changes made to the Income Statement in accordance with
- The new Income Statement will always include grouping on Account Type. If you did not include Account Type as a grouping option, it will be inserted as the first group in the report.
The Interest Expense categories were moved out of “Income (Loss) from Operations” and into “Net Income (Loss)”. For CenterPoint, the following account categories CHANGED the Account Type from Expense to Other Expense: Interest Other, Interest Mortgage, Term Interest, and Non-Term Interest.
- You can override the Farm Financial Standard Council Financial Guides for Agriculture recommendation of displaying Interest Expense in the Other Expense section of the Income Statement and move it to the Expense section instead in File > Preferences > Accounts > Personal Accounts by setting the Override box to Yes.
Note: When the Override preference is set to Yes, it will cause invalid ratio index analysis.
-
The new Income Statement includes the following Income Statement description changes:
-
Revenue - Cost of Goods - Expenses = Income (Loss) from Operations.
-
Income (Loss) from Operations + Other Revenue – Other Expense = Net Income (Loss).
-
-
Databases that include accounts with the Account property of “Personal” will display in a new Personal Account Type in the bottom section of the Income Statement below Other Revenue and Other Expense.
-
Personal Accounts are accounts in the account categories “Personal Income” and “Personal Expense”.
-
Personal Accounts are accounts in databases where File > Preferences > Accounts > Personal Accounts > Use Personal Accounts = Yes; AND the account in Setup > Accounts > Detail is selected as “This is a Personal Account”.
-
Personal Accounts display in the bottom section of the Income Statement below Other Revenue and Other Expense. Other Revenue and Expense are summarized as Net Other.
-
In databases with Personal Accounts, the Income Statement descriptions are as follows:
-
Revenue – Cost of Goods – Expenses = Income (Loss) from Operations
-
Income (Loss) from Operations + Other Revenue – Other Expense = Net Other
-
Net Other + Personal Income – Personal Expense = Net Income (Loss).
-
-
Detail Level Report Selection Filters
The following filters provide additional formatting for the Income Statement.
Display Level Report Selection Filter
- Select Reports > Reports.
- Expand the Financial Statements node and then select Income Statement.
- Choose the Display Level report selection filter. The new options for this filter are Level 2 Accounts, Level 3 Accounts, and Postable Accounts.
Level 2 and 3 Account Level Formatting
A new formatting method for Level 2 and 3 accounts is used in version 11 and later. Instead of group headers appearing as regular groups with their own indenting, the group headers are turned off and the parent accounts appear as separate lines with no amounts.
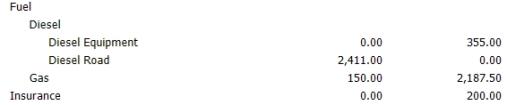
Diesel and Gas are Level 2 accounts. Gas is a postable account where Diesel has two Level 3 accounts below it. The indenting is done with spaces preceding the title not by the grouping. If the same were reported showing values at Level 2, the following displays:

Postable Account Level Formatting
A new formatting method for Postable accounts is used in version 11 and later. When detail is displayed at the postable account level, the special formatting displayed above is disabled. Since only the postable accounts are displayed, no Level 1 and 2 parent accounts are displayed so all accounts are left justified within the group. The example below displays no categories and no subtotals.

Display Subtotals Report Selection Filter
- Select Reports > Reports.
- Expand the Financial Statements node and then select Income Statement.
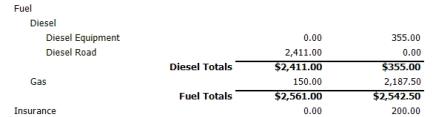
- Choose the Display Subtotals report selection filter. The new options for this filter are None, Category, and Level 2.
The Level 2 and Level 3 and Postable Account examples above had no subtotals displayed. If subtotals were displayed for all levels and detail was displayed at Level 3, the following displays:
Comparative Income Statement Options
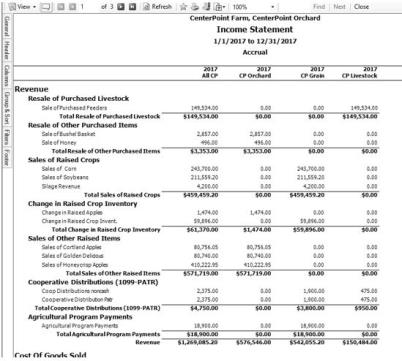
A new Report Selection filter is available that allows you to create a comparative Income Statement. This option allows you to define the items that you want to compare in up to 12 additional columns. The options that can be displayed to compare are Companies/Funds, Profit Centers/Departments, Profit Center Groups, Production Centers/Locatioins, Production Center Groups, Production Center Details, Projects, and Production Year. The current column and other period columns will continue to display values based on the sum of all the filters and options. The other columns will display only actual data and only for the period selected in the report options.
- Select Reports > Reports.
- Expand the Financial Statements node and then select Income Statement.
- Choose the Fill Other Columns With report selection filter.
- Select one of the available options that can be compared: Companies/Funds, Profit Centers/Departments, Profit Center Groups, Production Centers/Locations, Production Center Groups, Production Center Details, Projects, and Production Year. In the example below, Profit Center was selected and the report was filtered for the Corn and Soybean profit centers.
- Click Preview.
- Select the Columns tab, and then select the Available tab.
- Select Specified Column 1, and then select the type of column to display. In the example below, Col 1 Amount was selected. This allows the Jan 2016/Dec 2016 Corn column to be added to the report.
- Select Specified Column 2, and then select the type of column to display. In the example below, Col 2 Amount was selected. This allows the Jan 2016/Dec 2016 Soybeans column to be added to the report.
- Click Refresh.
Column and Group & Sort tab Changes
The following steps define how to locate and define additional columns on the Income Statement.
- From the preview of the Income Statement, click on the Columns or Group & Sort tab. All column types and columns that are available to print or group/sort on the report will be displayed in a new Available tab. Column types are displayed at the top node of each list next to the + sign. Examples of column types displayed below are Current Year, Current Year YTD, Year 1, Year 2, Current Budget, etc.
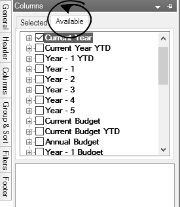
- To display all columns under each of the column types, for example Current Year, select the check box next to the column type Current Year and then click the + sign next to the check box.
-
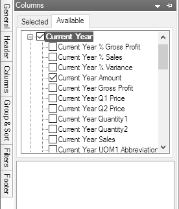
From the list of displayed columns under the column type, select the columns that you want to add to the Income Statement and format the column as in previous versions of the Income Statement with the exception of column headers, see the Changing the Default Column Header section below for more information on renaming column headers.
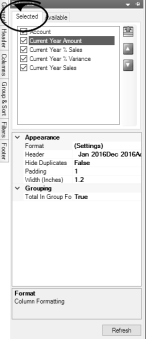
- Select the Selected tab to display all of the columns you selected on the Available tab to display on the Income Statement.
Changing the Default Column Header
The column default header is gathered from information from the filters, such as the date span or the "Fill Other Columns With" filter used for comparison Income Statements unless you've entered a column header of your own. The program generated column header text always begin with a "space" (the "space" triggers the column header text to be gathered from the filtered selections).
- If you wish customize and rename a column header:, from the Selected tab, select the column you want to rename, under Appearance select Header and remove the "space", and then enter your desired text.
-
Once the report is customized, save it as a favorite by selecting the Add to Favorites (Star) icon and naming the report. Note that if you change the report filters, a customized column header remains the same. If you change the filters, create a new variation of the report and save as a new favorite.
-
To display the base report default column headers again, return to the Columns tab. Select the column, under Appearance select Header, click the drop-down arrow. Re-insert a "space" in the first character. Refresh the report. The column header will gather the default filtered column header.
- The following comparative Income Statement is an example of customized column headings: